Categories
IGO720 - Module 4

Game Design…

Week 2.1 – 4th February. 2022

By the end of this 2nd week for IGO720, we are encouraged to look into the following areas;

  • Identify game design principles.
  • Analyse existing games in terms of game design principles.
  • Apply game design principles to create original game concepts.
  • Evaluate the scope of a game concept.

How to start the game design process?

We are asked to research one of our favourite games, and analyse it, as though we were creating a Game Design Document for it.

This encourages us to get familiar with creating Game Design Documents, and understand the processes involved, when working with a new game concept.

During Lobb’s video on; “Starting the Game Design Process“, he discusses numerous ways of developing your game, from the initial concept, using different prototypes, such as; paper prototyping, and digital prototyping, to working on the general mechanics first hand, and testing.

Mechanics – Fun Curve…

Whilst reading further into Scott Rogers book; “Level Up: The Guide To Great Video Game Design,” and specifically chapter 12; “The Nuts and Bolts of Mechanics“. I found a fantastic quote, which reminded me, to think about my own reason for wanting to play certain games, and what makes me want to keep playing, what is so appealing? Scott Rogers quotes;

“My key to keep players from “going over the fun curve” is to create ramping gameplay. A designer must build one gameplay system upon the last, teaching players a new move and how to master it against mechanics and enemies.”

(Rogers 2014, p361.)
0

I started to list what makes me drawn to my current games…

Castle Story – Phone App

  • Really nice colour of artwork/ well drawn/ and detail.
  • The imaginative journey you are taken on.
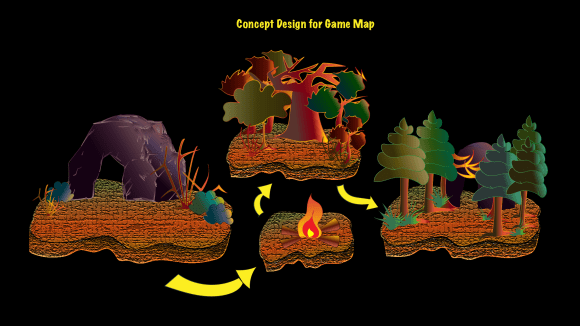
  • The task of making buildings, where you then need other objects to make other buildings/ which leads to upgrading.
  • Plus the idea of expanding the kingdom.
  • Plus characters that are cute, and speaks some text… to help get you more involved.

Although these are all positives, in my personal opinion, there are a few things which discourage me.

a) The time it takes to make certain items.

b) The amount of lives or health.

c) To much text.

I compared this game above to one, recently downloaded…

Lilys Garden – Phone App

  • Really nice colour of artwork/ well drawn/ and detail.
  • The imaginative journey you are taken on.
  • The task of improving your home design and garden, then you know you have to play the mix/match game grid again, then you get a reward/ incentive .
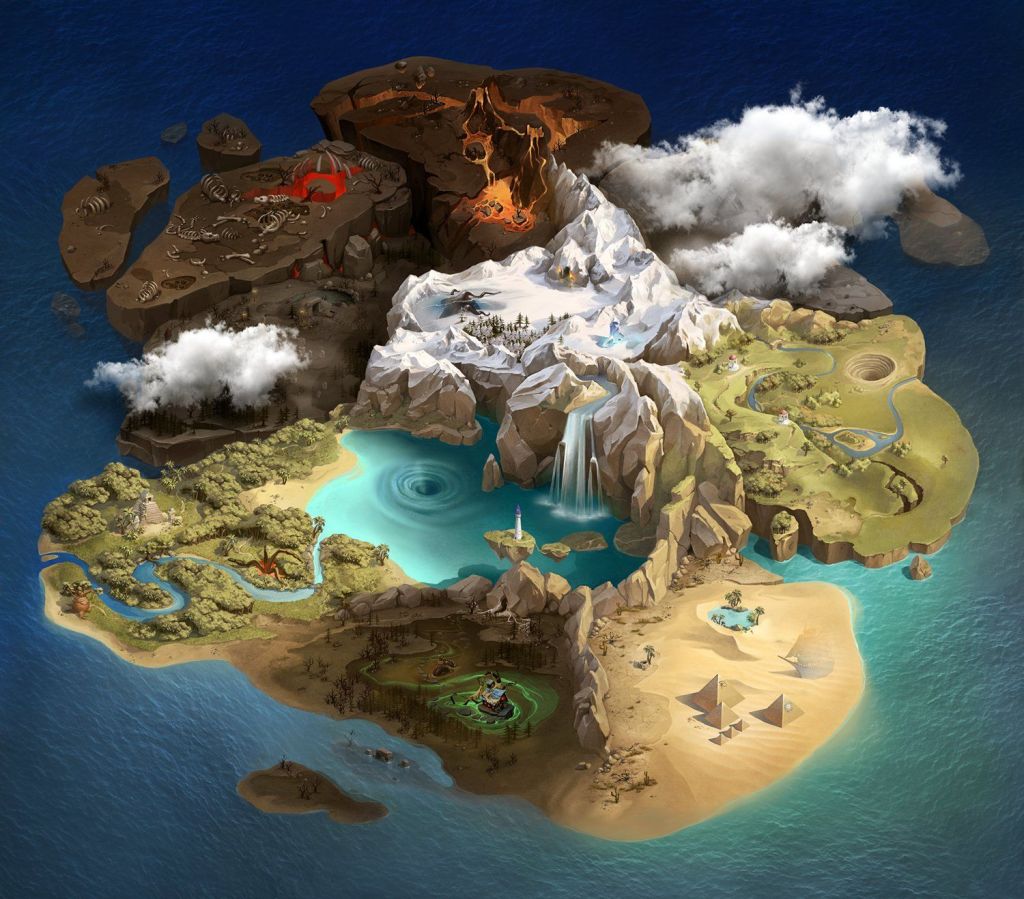
  • Plus the idea of reviving, redesigning and discovering new areas of house and garden, and a secret past of her aunt who left the house.
  • Plus characters that are cute, and speaks some text.. to help get you more involved.
  • Not to much text. Plus more free incentives.
  • Gameplay time increased… rewards that make you have unlimited time of your 4 lives.

The games I have briefly analysed above, are both really good at the point Scott Rogers highlights, that it is important to; ” build one gameplay system upon the last“, this helps me to re-focus on creating a detailed character, and re-drawing the character as a whole, from the front view to the side view, and once 3D modelled, to work on one mechanic at a time.

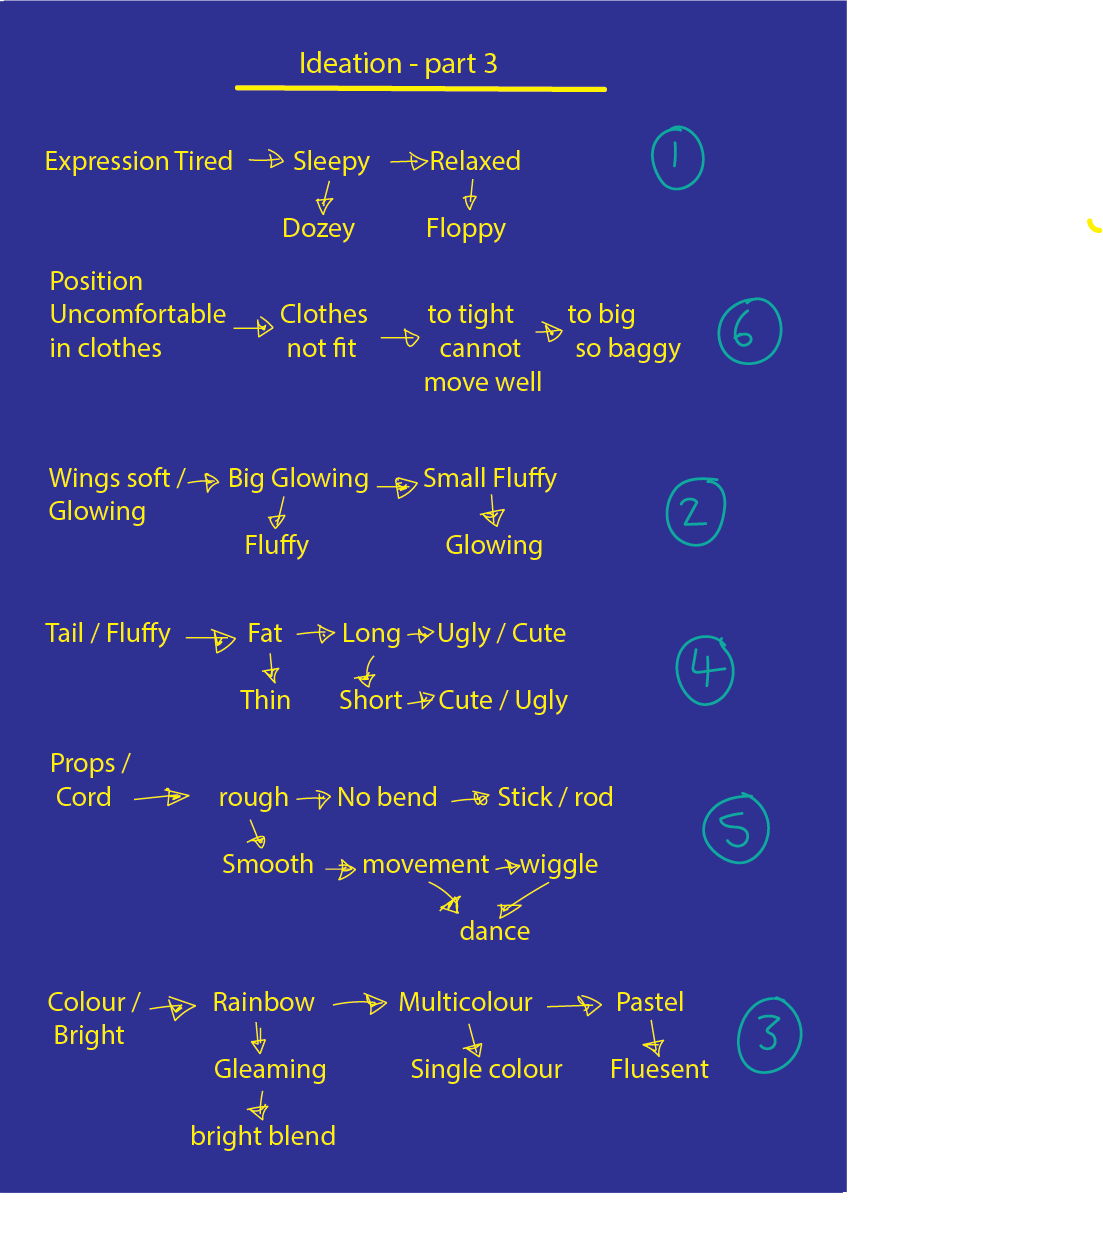
Note; to keep in mind: A clear idea of how my character looks and what she can do, and to think more about the mechanics that would match her personality and the story/ adventure of the game, as a whole.

Digital Prototyping…

Last week, I began the module, with a focus on speed, an aim to create a good story, which I already have, then a 3D character in Maya.

However the last character I created was low poly, and this time around I wanted to experiment with making a smooth 3D model, following a tutorial, as I displayed in last weeks images/ screen shots, and references. But problems arose.

From the image below, you can see I kept checking the head of the character from all angles, but in the front view, when I was trying to move an edge that was already part of the polygon, I wasn’t able to do so, and as I was using a apple magic mouse, I then began trying to add an edge loop, this is when finally the edge I wanted, become available to drag out to the required position.

(Figure 1: Norton 2022 Four View)

Problem – Edges

The images below show the extra edges that was created, and when the next step was to cut the head shape in half, selecting half was fine, but deleting half was not so simple. The polygon, left so many stray edges, which not only effected the shape of my head, but also the shade and colour.

Solution!

After some more research on 3D modelling tutorials, I have chose to follow a new professional, called; ‘Animator Artist Life‘, which are small tutorials less detailed and is helping me to create models in Maya, following the best practices.

  • First part is to create my front and side views of the whole character, ready to place into Maya. But it is very important, that they are exactly the same size. This may have been part of the problem, when also trying to model the head. The size was slightly smaller on one of my planes.

These small differences make a huge effect with your development time, and for your model to be made correctly, with a smooth finish, as I have recently found out.

Game Feel

In Steve Swink’s book: Game Feel; A Gamers Guide to Virtual Sensation“, and his chapter on; “The Game Feel Model of Interactivity. Steve Swink quotes;

“Experiencing game feel is feeling out the game world, making additional distinctions, and learning skills, concepts, and generalisations that make coping with the unique world easier.”

(Swink 2009, p65.)
0

He continues to explain that a game world should be simpler then, the real world. My understanding of, “feeling out the game world“, means, making sure I know the reason my character does, “what” particular action, “why“, and to embody the character.

I shall do this by acting out the movements, creating a voice for her, imagining the world she is in, what her emotion is, what she may be feeling, and picture what I might do, and my reaction, as if I was in her shoes.

This is how I hope to make the player “feel” my story, by doing the above and transforming those actions in Unreal, and adjusting the animations, to fit my character persona, with the animation blue print, and a blend space.

In the words of Mark Brown, and his video series called; “Game Maker’s Toolkit” – he analyses a numerous amount of games, paying close attention to; game design, level design, and game production.

“making every lick of polish, speak to what the game is really about.”

(Brown 2015)
)

This is was my initial intension, and from here out I will show you my development, from character – 3D modelling – videos of my progress, importing into Mixamo – and manipulating the animations in Unreal Engine 4.

Week 2.2 – 8th February. 2022
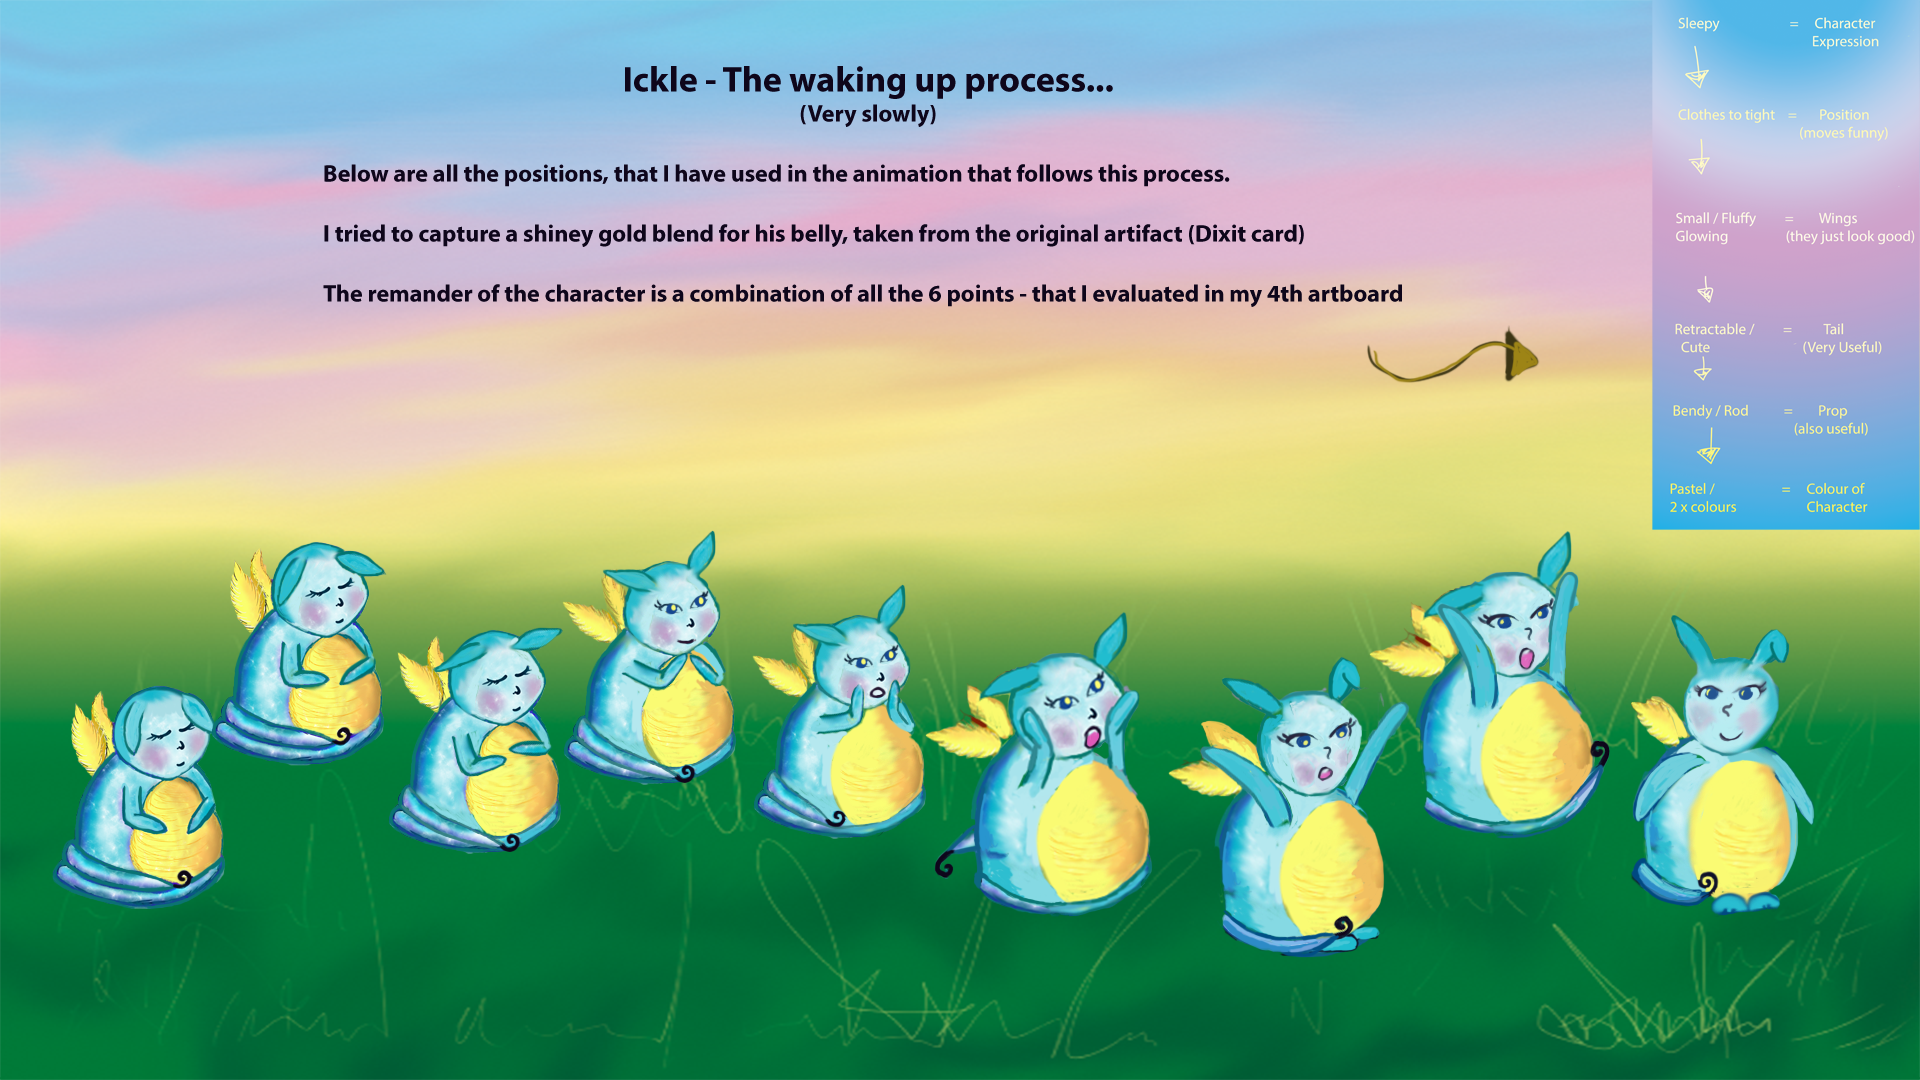
Character Design

Below is my main character for my new game concept. (click on image to see each one)

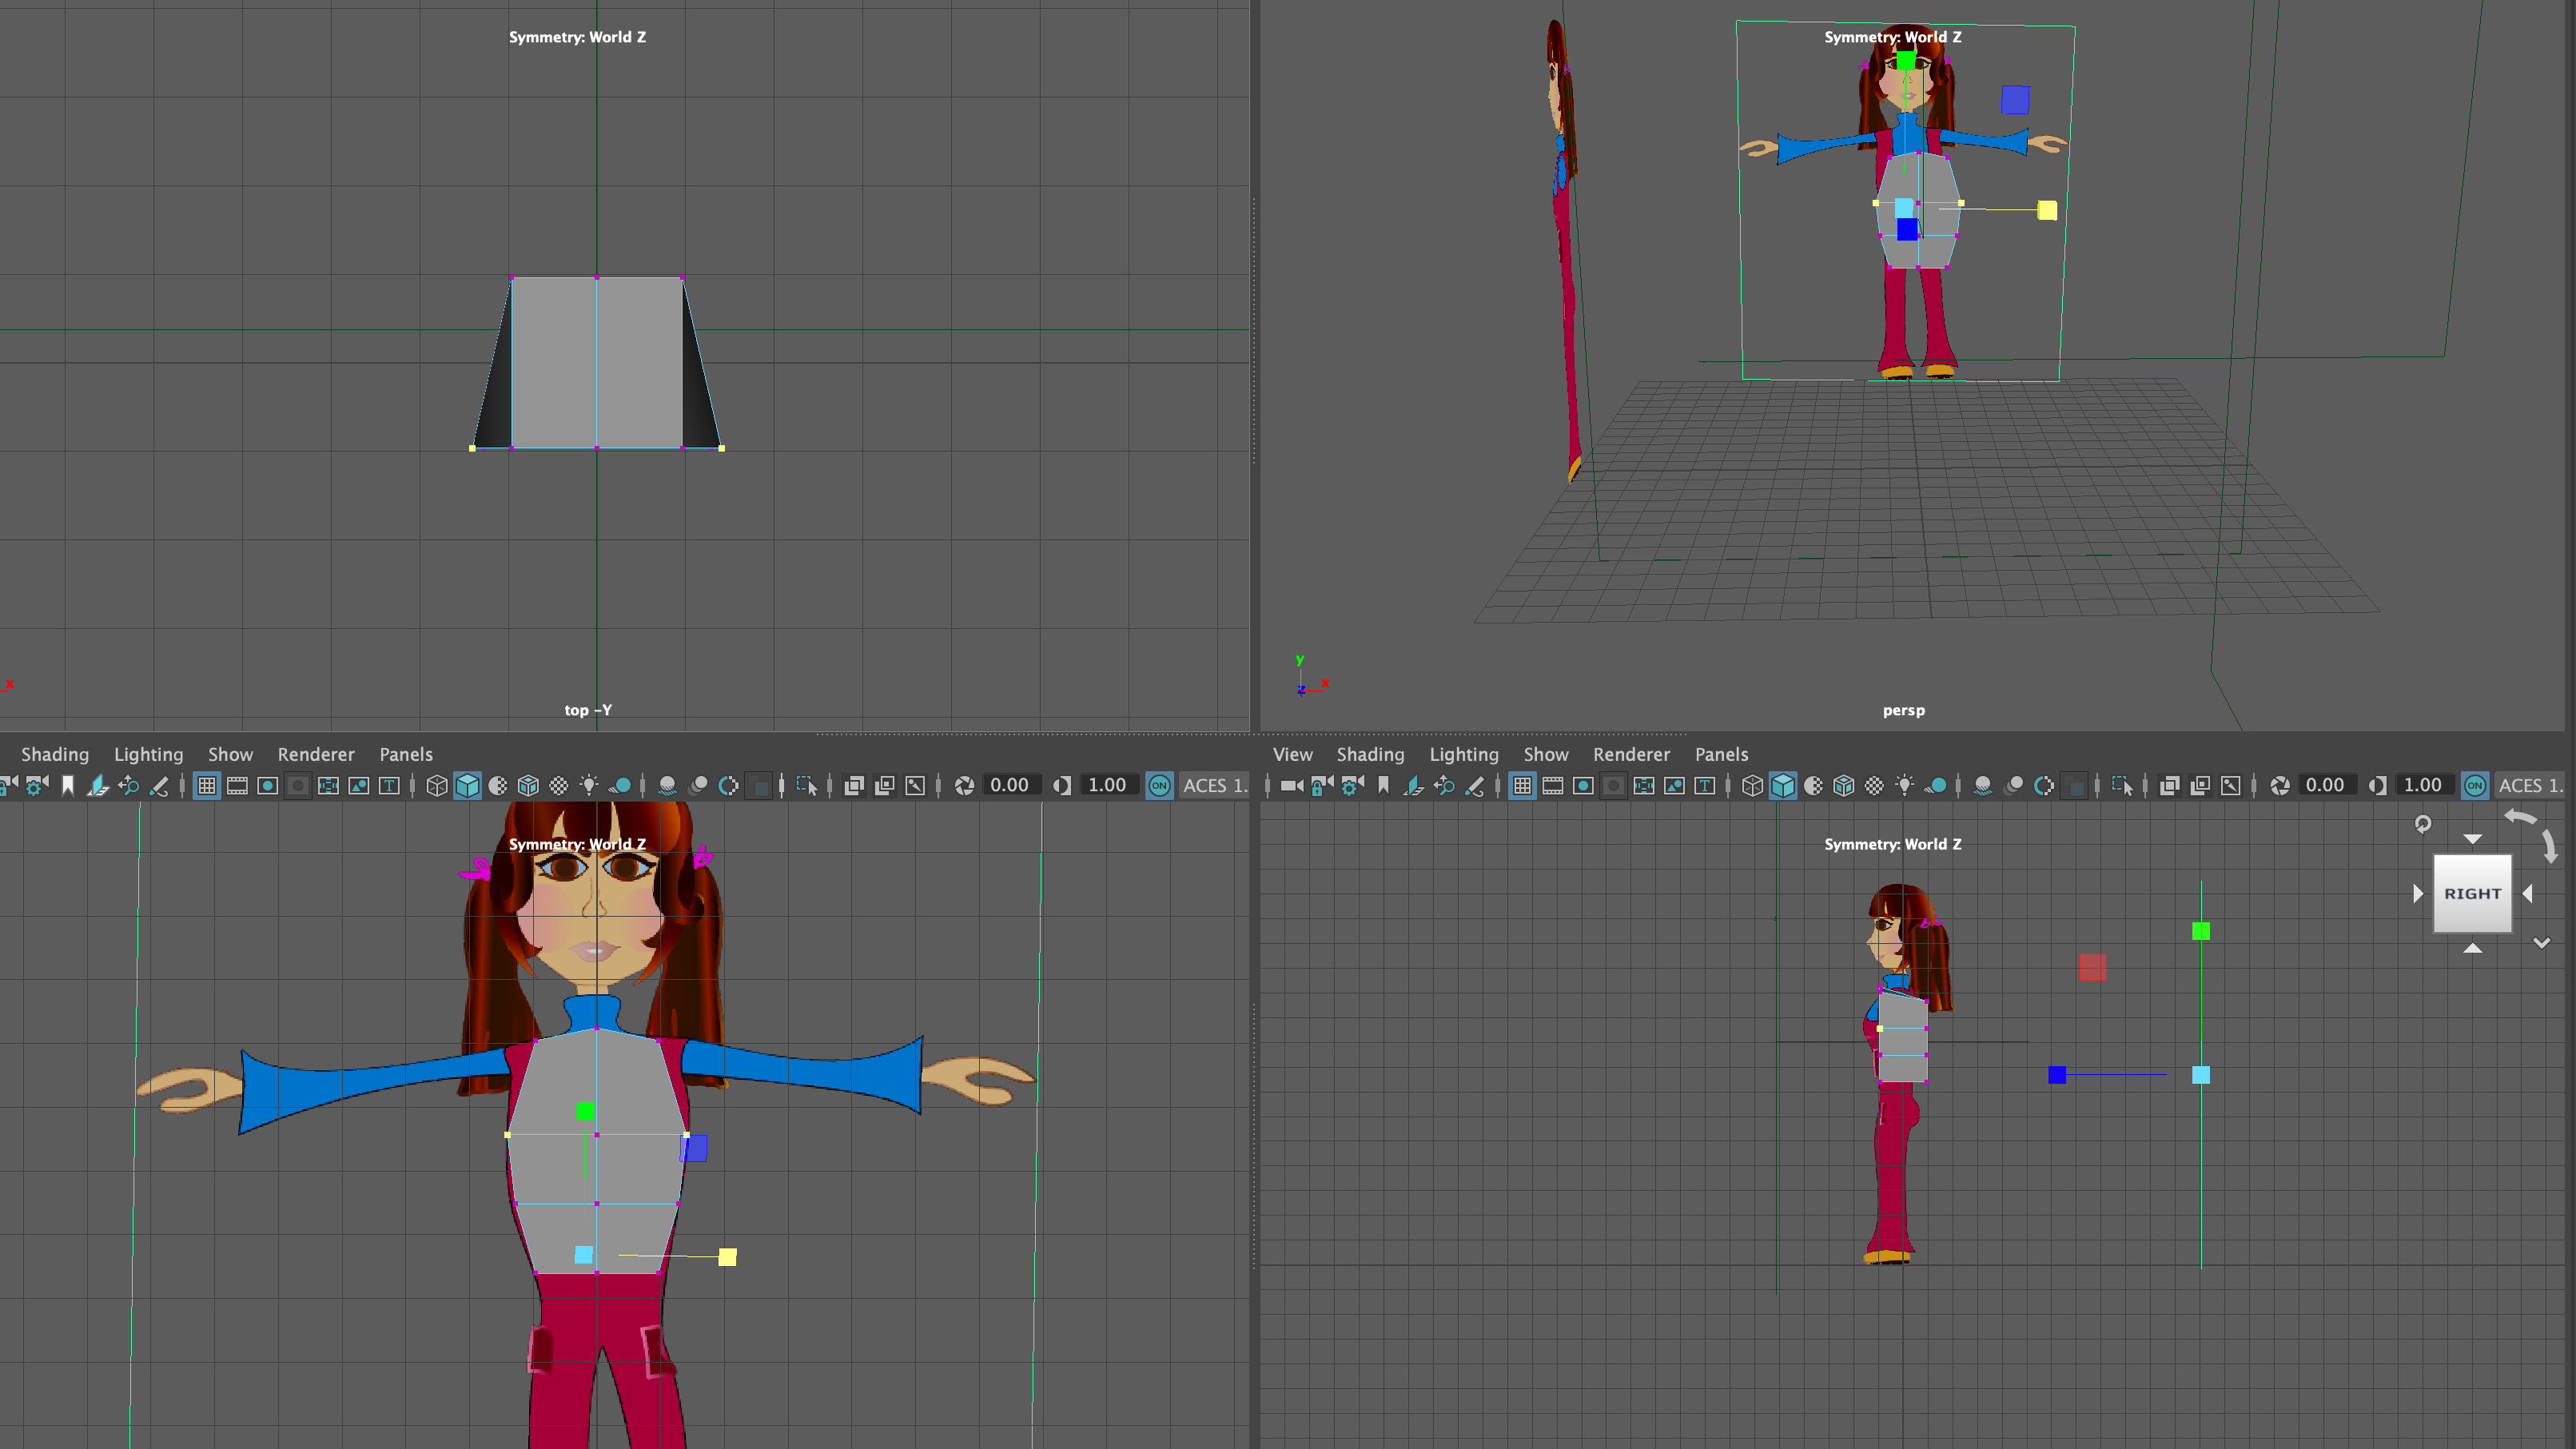
3D Maya Development…

First part of the process – Planes both in place – adjusted to size 2 – feet on the line. Starting with a simple cube, and making sure it is aligned with both planes. Making sure to manipulate the shape, add more faces, move edges and vertices, to match that of the characters shape.

(Figure 4: Norton 2022 Four View)

Continuing to develop characters Torso, shown below.

(Figure 5: Norton 2022 Four View)

After more development…

References

Lobb, I. (2022) Starting the Game Design Process. [online]. Available at: https://learn.falmouth.ac.uk/courses/251/pages/week-2-game-design-process-and-principles?module_item_id=13014 [Accessed 4 February 2022]

Animator Artist Life. 2020. ‘Setting up image planes in Maya – 3D Modelling a cartoon character – PART 01’ [online]. Available: https://www.youtube.com/watch?v=asfhKxLUdOQ&list=PLIV47uRi3f2Ub9INK89HnmkLgmNYjvcL6&index=2 [Accessed 7 February 2022]

Animator Artist Life. 2020. ‘How to Model a Cartoon Character in Maya – PART 02 – 3D poly modelling the Body’ [online]. Available: https://www.youtube.com/watch?v=asfhKxLUdOQ&list=PLIV47uRi3f2Ub9INK89HnmkLgmNYjvcL6&index=2 [Accessed 7 February 2022]

ROGERS, Scott. 2014. Level Up ; The Guide To Great Video Game Design. 2nd edn. John Wiley & Sons, Ltd.

SWINK, Steve. 2009. Game Feel ; Game Designer’s Guide to Virtual Sensation. Morgan Kaufmann Publishers.

BROWN, Mark. 2015. Game Maker’s Toolkit – Secrets of Game Feel and Juice. [online]. Available at : https://learn.falmouth.ac.uk/courses/251/pages/week-2-game-feel?module_item_id=13016 [Accessed 7 February 2022]

Full List of Figures

Figure 1 : Norton 2022 Four View (screen shot from Maya)

Figure 2 : Norton 2022 Front View (screen shot from Maya)

Figure 3 : Norton 2022 Side View (screen shot from Maya)

Figure 4 : Norton 2022 Four View (screen shot from Maya)

Figure 5 : Norton 2022 Four View (screen shot from Maya)

Categories
GDD730 - Module 2

Industry Insight – Part 2

Week 10.1 – 30th July. 2021

Experience of Freelancing

Well, where shall I start…This is a major topic for me to talk about, as I have always wanted to give this a try. Ever since I wrote and illustrated my Children’s Books, I had organised what art/ illustration I had to finally show for a portfolio, I thought I was ready to join an agency, and start freelancing..?

However this never happened…

I was determined to give it a go, and I joined an agency called ‘People Per Hour.‘ My experience with this agency was completely different then expected.

They were kind and very helpful, and gave me more details about the freelancing agency, and the process involved. But in-keeping with Phoebe Herring’s Industry experience, I can relate to the part where she mentions;

  • Sending her Artwork, then never hearing back from anyone.
  • Bidding for new opportunities, small jobs to complete, but the rate you are being charged is not worth your time, or patience.
  • Holding back applying for more jobs, just incase the other ones you have bidded for, do come back.

We are asked to consider these questions…

  1. Could your team benefit from employing a freelancer?
  2. What skills and competencies are missing from the team composition?
  3. Do you foresee any issues with employing freelancers so late into the project?

Below are my responses to the above questions.

  1. The way our team has been working together so far, to bring a new person in, even if he/ she had skills that we didn’t, I think would only hinder the teams progress.
  2. The only skills that are missing is a UX designer, however the team has worked it out that as we were not creating an app design, and a game to run on PC and Mac instead, we all checked before hand, what we could or couldn’t do as you can see from (week 2’s composition chart). We were all prepared and knew what needed to be worked on.
  3. Yes for sure, I would never want to employ a freelancer to a project, when you are nearly finished. I don’t see any point, ideally if you needed a certain skill from the beginning, which neither of the team members had, would have been the best time to get someone else on board, as they would need to bond too.

Launchpad Scheme

We are introduced to Warwick New, who had the opportunity to create a startup venture with Falmouth University’s Launchpad Scheme. After watching his video, listed are the key points for; what it offers you, what you can get from creating a startup venture, even if the company fails.??

  • Entrepreneurial Skills – What you need to set up your own tech /startup company.
  • Practise how to sell and market your product – What makes your artefact/prototypes stand out from the rest.

Warwick highlights a few things, which I think we have already got within our current team, 1) believing in your prototype, knowing there is a gap in the market for it. We have believed in our product since we started, but not quite each other.

Warwick clarify’s how important it is to feel motivated about your product, because as soon as you don’t have faith in your product or your team, you are likely to spiral downwards, as then the motivation/ reason of why you were working on this prototype, seems to disintegrate.

Key lessons we have learned.. .so far..?

  • Be open and honest from the start to improve, learn, test, re-make. (move forward for the better).
  • Don’t avoid problems, handle them straight away. (don’t let it fester).
  • Be sure to compliment each others work from time to time. (show you care).

Week 10.2 – 3rd August. 2021

Final piece of art to work on…

Here is a preview of our Trello board which shows the progress we have made so far with our prototype for our game Keep it Burning.

(Figure 1 : Norton, Ward, Lakin and Land 2021 The Wild Branch Kanban Board)

You can see what I am currently working on… One of the most interesting pieces of artwork I have done yet.!!

The

World

Map

I started off by re looking at my first basic isometric map, that I created in the beginning. Just to jog your memory…please see the image below…

(Figure 2 : Norton 2021 Original Concept Design for Game Map)

My initial inspiration was from some isometric maps I had been researching before hand, as a way of allowing the player to understand where they start in the game’s first level for; Keep It Burning, and what the end goal was, ie. finding another cave dwelling… bigger, more equipped, and more protected from predators.

However as I progressed with my concept art, after the practice pitch, one piece of my art work had been completely forgotten about, and I realised I wanted to focus more on the map I originally made with the style in mind as Bear & Breakfast, as per below.

(Figure 3 : Gummy Cat 2021 Progress Map: Bear & Breakfast)

Problem

Because I loved everything about the Bear & Breakfast Pitch Deck, I was extremely keen to stick with this style for the map, the notion of keeping everything straight forward, knowing exactly where you start, and where you end up, after progressing through the level, was my initial goal.

However my Original Concept Design for the Game Map didn’t get any response from the team at the time, which was not helpful. I knew it didn’t work other wise they would have said something, anyhow I was not sure why? I was under the impression that I needed to draw up a simple layout map, to show as part of our, ten minute video coming up. Everything was on layers, in Illustrator, so each layer was easy to remove at any time, if it didn’t work, if that was the case!?

Solution

After speaking to the others about the map, more recently, I proposed my idea, to say this is the map style I am looking at now, as the map is important, to show our progression, and this is the art work that caught my eye.

This is what I used as my world map inspiration layout, as it clearly shows 4 areas, and some hidden by cloud. I was sure that everyone would be keen on the layout, as it fit more perfectly with our in game pixel art style too. I assume this was the reason that I didn’t receive feedback, due to me personally not doing pixel art, even though we said at the beginning of the project that we would mix textures.!? Luckily I was right, and they all was keen for me to experiment with the style…

(Figure 4 : Kashkina 2021 Location of land)

As you can see the amount of detail that has gone into Kaskina’s Location of Land is amazing. All I want to do in my version, is focus on creating at least 4 , domain’s, one as the starting area, next, where you progress too, and a couple locked locations hidden by the cloud, finished with a little detail.

Below is a gallery so you can see my progress.

Week 10.3 – 4th August. 2021

Reflecting

During the week, I have started to feel that we really are picking up the speed, but I think this is because everyone realises, that we only have a couple weeks to go and ideally it would be productive now, for each team member to focus on catching up with their blogs. In regards to time pressure, the reading; What Do We Know About Time Pressure in Software Development?, by Kuutila, Mantyla, Farooq, & Claes.

On the positive side, time pressure can force a development team to focus on the paramount features of a product. On the negative side, time pressure can induce tunnel vision where making the next deadline is prioritized over product quality and worker well-being.

(Kuutila, Mantyla, Farooq, & Claes. 2020)
.

According to; Kuutila, Mantyla, Farooq, & Claes, software development has usually got a fair amount of time pressure and deadlines involved, which can lead to all different outcomes. I understand it, not always to be a bad thing, as it can almost give you a boost of positivity…

I believe that when you are nearing your end goal, their is an automatic switch inside that says go..go..go.., even if you have been giving your all throughout the project, you just want to push your self a tiny bit more, (not that you actually do though). Then when it is the time to view the prototype, and check out the finished artefact… it feels so rewarding.

Its almost like reaching the crescendo just before the end of a song, I start to feel relaxed once I have reached that final big note…then sad and pleased at the same time, because although the song has finished, you can begin the same process again, another time.

References

DeMarco, T. and Lister, T., 2013. Peopleware: productive projects and teams. Addison-Wesley.

Kaskina, E. 2021. Location of Land. Available at : https://www.pinterest.co.uk/pin/161003755405283700/ [Accessed 03/08/21]

Herring, P. 2020. Phoebe Herring on Freelance. Available at : https://flex.falmouth.ac.uk/courses/913/pages/week-10-phoebe-herring-on-freelance?module_item_id=54820 [Accessed 31/07/21]

New, W. 2020. My experience creating a startup at Launchpad. Available at : https://flex.falmouth.ac.uk/courses/913/pages/week-10-alumni-video-warwick-new?module_item_id=54821 [Accessed 31/07/21]

Kuutila, M., Mantyla, M., Farooq, U., & Claes, M. 2020. What Do We Know About Time Pressure in Software Development? IEEE Software.

Full list of Figures

Figure 1 : Norton, Ward, Lakin and Land 2021 The Wild Branch Kanban Board

Figure 2 : Norton 2021 Original Concept Design for Game Map

Figure 3 : Gummy Cat 2021 Progress Map: Bear & Breakfast

Figure 4 : Kashkina 2021 Location of land: on Art Station

Categories
GDD710 - Module 1

Rapid Ideation – Session 1

Week 4.1 – 17th February. 2021

Part 1 : Setting the Theme

The Dixit card picked at random – From here we are to interpret however we want, and experiment with the artefact in anyway we please. 

Part 2 : Choosing a Headline

We are asked to pick a headline from a news website, newspaper, or magazine of choice.

(Figure 1: The Dixit card 2021 The Theme)

Ideation process – Brainstorm

I have began with a rather detailed brainstorm, I chose to base around 4 areas of the artefact, but then realised there is another 2 areas, they were staring me in the face the whole time. Very obvious, they were the wings, and a tail.

After the initial brainstorm was put into action, I felt excited and a little overwhelmed with how many opposites arose, and would need to be narrowed down. To get a crisp conclusion, I would now approach the second art board, using a different technique.

Please see Brainstorm below.

(Figure 2: Norton 2021 Dixit Brainstorm)

Simple Method

I wanted to reduce the words, but not just from my own choice. I used the simple technique, as explained below.

I closed my eyes, to keep the process quick – counted to 11, moved my finger over each section clockwise, then stopped. After doing this 6x, and counting to numerous numbers, changing the position to anticlockwise, then in different shapes…these are what arose from the simple technique.

  1. Tired
  2. Soft and Glowing
  3. Bright
  4. Fluffy
  5. Cord
  6. Uncomfortable in clothes

Please see Ideation Part 2 below.

(Figure 3: Norton 2021 Ideation Part 2)

Please see Ideation part 3 below.  

(Figure 4: Norton 2021 Ideation Part 3)

Evaluating Development

The 3rd art board – Shows me evaluating the 6 results, which I could have left at this point, but I decided to brainstorm the main areas one more time. This has led me to the final art board, revealing a general feel for my final interpretation of the essential points taken from the artefact, which will be combined with my headline. 

(Figure 5: Norton 2021 Ideation Part 4)

Result below

Having done my brainstorms, focusing on the key elements of the artefact, being; 

  1. Character expression
  2. Position
  3. Wings
  4. Tail
  5. Prop
  6. Colour of character

For me this is enough detail to remediate the original artefact and develop, alongside my headline. 

Week 4.2 – 17th February. 2021

Part 2 : The Headline;

I did what was required, not thought too deeply about the meaning of the headline. Just wanted to do a general search on animation magazines, and this is the headline I chose.

Animation Magazine“Snail of a Tale: Tim Hill Gives Us the Scoop on ‘The SpongeBob Movie: Sponge on the Run”

The word’s ‘snail, tale, scoop and sponge’, is what immediately captured my attention at first glance, and the more I delved deeper into the story that was behind the headline, I realised I could relate it to a new game creation, whether a new background, character, creative narrative script, sound, or audio atmosphere, the possibilities were endless.

Next to work with an alternative method for the headline.

New Method Storyboarding:

 After researching, I have decided to use the storyboard technique, due to it being a visual way of developing ideation skills, and one that you can easily amend.

At the moment, I feel like I am working backwards to go forwards. I would usually explore an image, by laying it out on paper, or digitally on Adobe Illustrator, and simply draw what comes into my mind. 

Instead I have brainstormed the artefact, and the outcome is a lot more clarified, then it would have been with me sketching numerous times.

Prototyping Tool

I have downloaded one tool that was noted for prototyping, called Toon boom, software for storyboarding and animation production. 

After watching the youtube videos, on Toon Boom’s Storyboard Pro, and Harmony 20. I found when making notes on how to use, yet another new tool that Storyboard Pro, seemed a little less in depth.

I could be wrong, however this is my next starting point.

Week 4.3 – 17th February. 2021

Storyboard Pro – First experience:

My aim was to create a character, and a new background for the start of a game or animation.I had a brief specification to start me off for my character development, following on from the start of the rapid ideation session.

I found the brushes on here easy to use. It is a straight forward process to adjust the size and shape, which is good for when you are working to a set time.

Brushes; what I used to create the look below; 

  1. Textured Wash – size 250 2) Pipe Cleaner – size 130 3) Pastle 2 – Size’s between 120-170

Character below : Ickle

(Figure 6: Norton 2021 Ickle)

Problem

However, after I had realised my character was on a solid white back ground…I thought I could easily change it in Storyboard Pro, like I do in Photoshop, select the eraser and take out the white, to create a translucent background.
Though this was not possible, which set me back a little, I then realised I would have to export it as a PSD or PNG, which I could then amend in Photoshop.

Solution

After having a brief discussion with Patricio, he recommended some of the other tools I could use to create animation. Luckily one of them was Photoshop.

I started following a step guide – on how to create a frame animation, in photoshop itself.
I worked with one background, as a normal layer. I only created 3 frames on top of my other layers to see how the character moved.

Below is all the frames I used to put together a Photoshop frame animation.

(Figure 7: Norton 2021 Ickle character poses)

Problem

I was pleased with this outcome, although it wasn’t that smooth, and after watching the 2d animation tutorial on LinkedIn, with Dermot, I wanted to look at adding a couple tweens, as he showed how they could help when transitioning one movement to the next.
Though when I added 5 tweens, to my frame animation… It didn’t look much different, even if I changed the opacity, position, or size. 

Conclusion

In my opinion, this was not working unless you wanted a very basic, almost ‘flip book’ style animation. This being my first proper animation experience, was quite quick to achieve, but I wanted it to be better.

After further research, I changed the option to video layers, because I have looked into Olaf Storm, who uses Photoshop, to create his animations using Video layers.

References

ZAHED, Ramin. 2020. Animation Magazine. Snail of a Tale: Tim Hill Gives Us the Scoop on ‘The SpongeBob Movie: Sponge on the Run’ [online] Available at: https://www.animationmagazine.net/features/snail-of-a-tale-tim-hill-gives-us-the-scoop-on-the-spongebob-movie-sponge-on-the-run/ [accessed 17/02/21]

Toon Boom Learn Portal. 2021 Storyboard Pro 20. Available at: https://store.toonboom.com/downloads/try/647 [accesed 17/02/21]

Full List of Figures

Figure 1: Dixit 2021 The Theme

Figure 2: Norton 2021 Dixit Brainstorm Adobe Photoshop

Figure 3: Norton 2021 Ideation Part 2 Adobe Photoshop

Figure 4: Norton 2021 Ideation Part 3 Adobe Photoshop

Figure 5: Norton 2021 Ideation Part 4 Adobe Photoshop

Figure 6: Norton 2021 Ickle created in Storyboard Pro

Figure 7: Norton 2021 Ickle character poses created in Photoshop

Categories
GDD710 - Module 1

What is Rapid Ideation?

Week 3.1– 8th February. 2021

When I think of how games are made, I now understand why ‘rapid ideation‘ is vital. 

The amount of time it takes to test and implement new ideas and check off what works or not, what key features are going to be included and why, what emotion, or atmosphere you are trying to create for your audience, and knowing who your audience is aimed at.

The development process, could take a lot longer if this approach was not put into action. However when working on a prototype, you follow a loose theme, which I understand to be, any part of a game, eg. a particular level, where you take part in game jam’s, where you only have a limited time to get your ideas noted down, tested and re-tested in different ways.

The aim is to fail, and to do so fast! By keeping this in mind, everything you create should be a rough prototype that can be developed continuously in numerous amount of ways.

Brain storms, and body storms is what I already do. But now I am experimenting with new things and its getting really exciting! 

Some of my peers recently used ; White boxing. I am temped to give it a trial run, but I am trying to keep my direction focused with the Kanban method, I must apply my steps of development in order to learn any other prototype techniques later on. But this is not important for now.

Week 3.2 – 10th February. 2021

Challenge activity

  • Choose one or two different methods of prototyping
  • Identify any interesting characteristics you like about it

Legend of Zelda; Breath of the Wild

by Nintendo.

The methods I have experimented with are; Game PrototypingPhotoshop Sketch Prototping Photoshop 

I knew we needed to be quick with this rapid ideation process, thats why I used photoshop, due to still learning how to use Blender.

I wanted to work on one of the scenic backgrounds, with a concept in mind about creating a new level.

Although this game has got beautiful scenery throughout, I wanted to experiment with effects and decided on this scenic view below. 

Concept

With this in mind – The aim is to take the image apart, by transforming it into tiles, or jigsaw pieces. Then as you entered the new level you would have to piece the picture together before you could even start. 

Problem

The reason why it took so long was due to a plugin called Comic kit, (originally was going to be used on my third picture below) I thought it would help with the speediness needed for this approach, however the download took a long time and would not open in photoshop.

Solution

I therefore had to do the rest by hand, but in doing so… I crafted something more unusual than planned.

I am very pleased with it, and wish I had not hesitated to draw by hand from the beginning.

First part of process

  •  Add gradient map to the original art work – clicked reverse 

This gave me more shadow definition – then converted it to a smart object – toggled with a few different effects, (once again I have never use these before.)

But the one I chose is called crystallize – cell size 20 – this was the closest thing I could get with an outcome similar to a tile effect.

Second part of process

I played around with another filter called noise – dust and scratches – adjusted the radius and threshold many times until I chose to stick with radius 18 and threshold 28.

This time around, the effect was more fluffy and light, and then I started to imagine Zelda entering this level, as though he was dreaming.

**Comic kit Plugin; As I mentioned earlier, the idea was to make the level into a jigsaw – Thats why I was downloading the comic kit plugin, to add to my 3rd picture of the development process, it should have gave me access to line patterns / shapes, and then selected each one, within a cartoon style. This was going to be a quick way of making a puzzle, by extracting the highlighted shapes from it.

Final part of process

Next as the cartoon effect was not an option, I traced over every line I could see, concentrating on the jigsaw idea. From here I discovered that by tracing all the lines, I had traced the shadows to, which then altered my original notion of creating a new level which you can only enter, when you have completed the jigsaw, but not just a normal jigsaw piece, but the shape of the shadows to, as you can see…it would be quick difficult. 

I personal would like to try this, and I know it would keep me engaged…knowing you can’t start the level until the whole jigsaw is complete.

(Figure 1: Reddit Inc. 2020 Satori Mountain at sunset)

Testing

To test this jigsaw out, I would have liked to place it onto Blender or Unity, and picked the pieces off individually, by timing myself to see how long it would take to put back together, and find out if their were any issues.

Plus to develop even further, you could make the levels start with numerous jigsaws throughout, and to complete each one, by using different textured puzzles.


References

RUBINO, Giovanni. 2021. Rapid Ideation. Available at : https://flex.falmouth.ac.uk/courses/911/pages/week-3-what-is-rapid-ideation?module_item_id=49152 [accessed 8 Feb 2021]

Reddit Inc. 2020. ‘Satori Mountain at sunset’ Available at : https://www.reddit.com/r/AstralObservatory/comments/dp17iw/satori_mountain_at_sunset/ [accessed 10 Feb 2021]

Full List of Figures

Figure 1: Reddit Inc. 2020 Satori Mountain at sunset